

Number: The secret patterns behind string art
View Sequence overviewA loop can replace a repeating sequence of instructions with a single set of instructions.
A variable can stand in for a value that changes in a predictable way.
Whole class
The secret patterns behind string art Slides
Each student
Completed Quadrant 1 Student sheet from Task 1
Device with access to Scratch (if devices are limited, the activity works well with one device per pair)
Task
Ask students to open their Scratch projects from Task 2. Display the code that produced all 11 lines. Ask: We wrote this code to draw 11 lines. What if we wanted to draw 100 lines instead? What would that code look like?
Students might say the code would be enormous, or that it would take forever to write, or that it would just be the same thing repeated over and over.
Ask:
- What specifically would be repeating?
- What would be the only thing that changes each time?
- How long do you think it would take to write that? Is there a better way?
| If a student says... | Try... |
|---|---|
| ...the code would just be really long | What makes it long? Is every line of code doing something completely different, or is something repeating? |
| ...it would be the same thing over and over | What exactly is the same each time? And what is different? |
| ...only the numbers change | Which numbers? Where do those numbers come from?” |
If students are struggling to identify what stays the same and what changes, display Slide 15 of The secret patterns behind string art Slides, showing three blocks of code side by side: the code for the first line, the second, and the third. Ask students to take out their Quadrant 1 Student sheet from Task 1 and point between the code and the table explicitly. Each block of code corresponds to one row of the table. The structure of the code maps to the structure of every row: same sequence of blocks, same order. The coordinate values map to the numbers in each row: the only thing that changes as you move down the table is the $x$-coordinate of the start point and the $y$-coordinate of the end point.
Tell students: If the structure is identical every time and the values change in a predictable way, there is a way to write one instruction that does the work of all 11. That instruction is called a loop.
Tell students: If the structure of the code is identical every time, and the only thing that changes are the coordinate values, we can write one set of instructions that repeats and changes those values automatically.
To do this, the code will need to use variables: placeholders that hold the current coordinate values and update them each time a new line is drawn.
Variables in Scratch are found in the Variables category in the block palette. To create one, click Make a Variable, give it a name, select For all sprites, and click OK. The variable will appear as an orange block that can be dragged into any field that accepts a value.
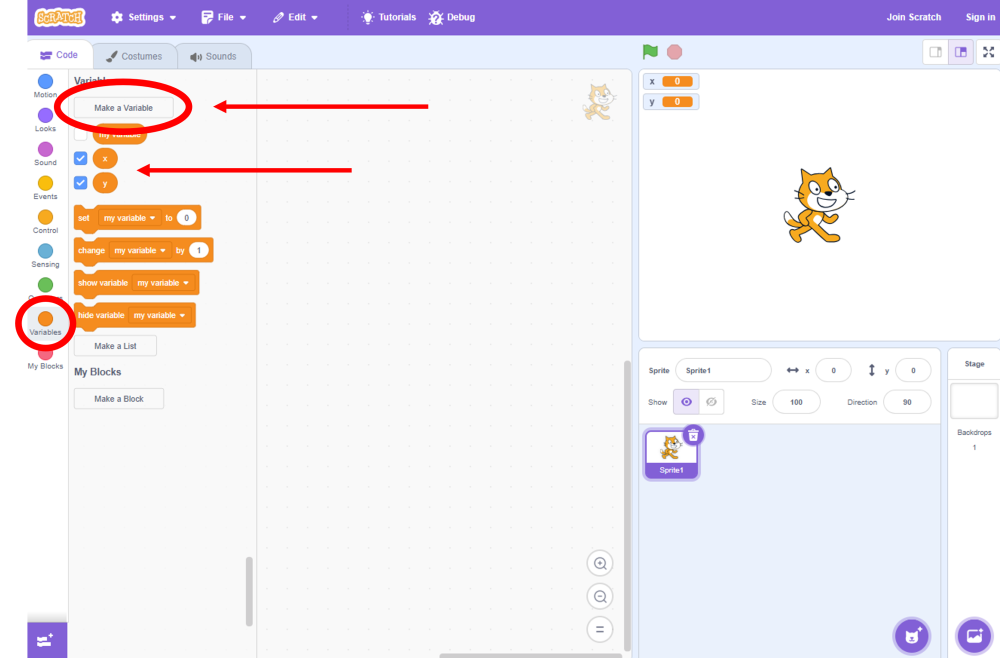
This sequence uses two variables: x, which tracks how far along the horizontal axis each line starts, and y, which tracks how far up the vertical axis each line ends.
To set a variable to a starting value, use the set [ ] to ( ) block.

To change its value during a loop, use the change [ ] by ( ) block.

If the variable needs to increase by 10 each repetition, enter 10. If it needs to decrease by 10 each repetition, enter -10. Think of this as adding or subtracting 10 from the current value each time the loop runs.
Build the loop together
Build the loop on the board one block at a time.
Before drawing any lines, initialise the two variables at the top of the script:
- Set x to 100
- Set y to 0
Add a repeat ( ) block.
The repeat ( ) block is found in the Control category in the block palette. It wraps around other blocks, forming a C-shape, and the number inside it determines how many times the enclosed blocks will run. Drag it into the script and snap the blocks that need to repeat inside it.
Ask: How many lines will we need to draw? How do you know?
Give students a moment to think and to justify their answer by pointing to something: their table, their hand-drawn image, or their Scratch project from Task 2. Establish that 11 lines were drawn, and that this is the number of times the code will need to repeat. This is the number that goes in the repeat ( ) block.
Inside the repeat ( ) block, add the following blocks in order:
- Go to x: (x) y: 0
- The sprite moves to the start of the line on the horizontal axis.
- Pen down
- Go to x: 0 y: (y)
- The sprite draws across to the end of the line on the vertical axis.
- Pen up
- Change x by ( )
- Ask students: Is x getting bigger or smaller each time? By how much?
- Change y by ( )
- Ask students: Is y getting bigger or smaller each time? By how much?
The completed loop code for this section is shown below.
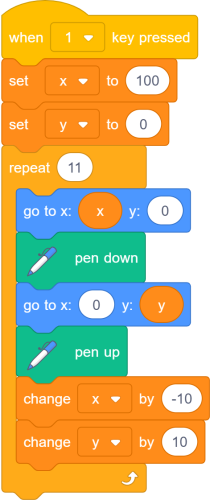
For students who are unsure whether their loop is correct, ask them to trace through it manually before running it, using their table from the Quadrant 1 Student sheet from Task 1 as a reference.
Display Slide 16 showing the loop with the starting values of x and y. Ask: What value do x and y have at the very beginning? Where in your table do you see those values?
Ask students to point to the corresponding row in their table before moving on. Then ask: After the first repetition, what will the new values of x and y be? Where do you see that in your table?
Students should identify that x will become 90 and y will become 10, corresponding to the second row of the table. Display Slide 17 to confirm.
Then ask: What do you expect the values to be after the second repetition? Find that row in your table first.
Display Slide 18 to confirm. By this point students should be predicting from the table before the slide confirms.
Setting up scripts for different quadrants
Rather than running all four quadrants from a single script, this sequence uses a separate script for each quadrant triggered by a key press: when 1 key pressed draws quadrant 1, when 2 key pressed draws quadrant 2, and so on. This makes it easy to test each quadrant independently and debug one section without affecting the others.
Ask students to replace the when green flag clicked block at the top of their loop with a when 1 key pressed block. The rest of the loop stays the same.
Display Slide 19 showing the long line-by-line code alongside the loop. Ask: What do you notice?
Prompt the discussion:
- Both sets of code produce exactly the same image. What is different about them?
- Which did you find easier to write? Which do you think is easier to read?
- If you made a mistake somewhere in the long version, how easy would it be to find it?
- If you wanted to change the design slightly, which version would be easier to update?
- Is one version better than the other, or do they just have different qualities?
There is no correct answer here. What matters is that students understand the two versions involve different trade-offs, not that one is better.
Loop unrolling: when efficiency works the other way
In this sequence, students move from a long line-by-line code to a shorter loop. Neither approach is strictly better than the other: they involve different trade-offs depending on the context.
The loop is easier to read and maintain. If the rule changes, only one place in the code needs updating. The line-by-line version, by contrast, requires every repeated block to be changed individually, and the longer the code, the greater the chance of a human error creeping in.
However, when a computer runs a loop, it has to do extra work on each repetition: checking whether the loop has finished, jumping back to the start, and updating the counter variable. For a loop that runs millions of times, that overhead adds up. In performance-critical contexts such as graphics processing, game engines, or real-time simulations, a programmer might choose to write out repeated instructions explicitly because the processor can execute a straight sequence of instructions faster than it can manage the bookkeeping of a loop. This is called loop unrolling.
Modern compilers often do this automatically, detecting short loops and unrolling them behind the scenes without the programmer having to do anything.
In this sequence, students move from a long line-by-line code to a shorter loop. Neither approach is strictly better than the other: they involve different trade-offs depending on the context.
The loop is easier to read and maintain. If the rule changes, only one place in the code needs updating. The line-by-line version, by contrast, requires every repeated block to be changed individually, and the longer the code, the greater the chance of a human error creeping in.
However, when a computer runs a loop, it has to do extra work on each repetition: checking whether the loop has finished, jumping back to the start, and updating the counter variable. For a loop that runs millions of times, that overhead adds up. In performance-critical contexts such as graphics processing, game engines, or real-time simulations, a programmer might choose to write out repeated instructions explicitly because the processor can execute a straight sequence of instructions faster than it can manage the bookkeeping of a loop. This is called loop unrolling.
Modern compilers often do this automatically, detecting short loops and unrolling them behind the scenes without the programmer having to do anything.
Tell students the class is now going to look at some modified versions of the code and predict what picture will be drawn.
Display Slides 20-23. For each slide, on the left is the original code the class built together. On the right is a modified version with something changed. Ask students to find the difference before anything is revealed: Look at both versions carefully. Can you spot what has changed?
Give students a moment to look independently. Then work through the animation to highlight the change, and ask: What do you predict this modified loop will draw? How many lines will there be? Where will they start and end? What will it look like?
Take predictions and ask students to justify their reasoning. Then work through the animation to reveal the result.
| Slide | What changed | What students will see | Questions to ask |
|---|---|---|---|
| 20 | repeat 5 instead of repeat 11 | Only five lines are drawn, but they are in exactly the right place. | Why did it stop there? What would we need to change to complete the image? |
| 21 | change by 20 instead of 10 for both x and y | The lines are further apart, and some extend beyond the first quadrant because the loop still repeats 11 times. | Why are the lines further apart? The image is the same width and height as the original. Why? If we wanted to keep the change by 20 but stop the lines extending beyond the first quadrant, what would we need to change? How many repeats would we need? |
| 22 | x starts at 200 instead of 100 | The image is stretched horizontally: lines start further to the right but still end on the vertical axis. | What changed in the image? What stayed the same? Why did changing the starting value of x stretch the image horizontally but not vertically? |
Slide 23 shows an image without the code. This time students work backwards: given the image, what must have changed in the code to produce it?
Ask: What do you notice about this image compared to the original? Something in the code has changed. Where do you think the change might be?
If the discussion is stalling, work through the animation to reveal which line of code has changed. Ask: Now that you can see which line changed, what value do you think goes in the blank (what is y changing by)? What makes you say that?
Push for justifications that connect the value to the image, for example: I think it’s a number with a minus sign because the image looks like it’s gone the other way or I think it’s 0 because the lines aren’t moving up or down.
Reveal that the answer is -10. Ask: We have seen the change by blocks before. In our original loop, x started at 100 and decreased by 10 each time. But y starts at 0. What happens when you subtract 10 from 0? Can you even do that?
Give students a moment to think. Then ask: The image suggests something is happening below where we started. What might that mean?
Leave the question open. Tell students: Next lesson we are going to find out exactly what numbers with a minus sign mean and use them to complete the rest of the image.